Sunday, December 26, 2010

Cheddar Spritz Crackers


For the holidays I like to make star-shaped buttery vanilla spritz cookies topped with Hershey's kisses aka "Nipple Cookies" but my current obsession with savoury cookies (they go better with booze!) led me to this recipe for savoury cheddar spritz crackers.
This recipe also gives me further justification for the cookie press that has been sitting in my pantry and comes out only at the holidays.
These are a spicy cheesy cookie, made with cheddar and a healthy dose of Worcestershire and Tabasco sauce. Spritz or cookie press cookies are a bit of a pain to make because you need to get into a bit of a rhythm with the cookie press. Too much pressure results in squished cookie blobs and too little the cookies will burn and the shape won't be perfect. I tried experimenting with a different design rather than delicate star shapes, because these shortbread don't taste dainty and I think the waffle pattern I chose is more fitting to a boldly flavoured spicy cookie.

Cheddar Spritz Crackers
Dairy
Makes: about 8 dozen cookies

  • 1 lb sharp cheddar or aged swiss finely shredded
  • 1/2 cup butter, softened
  • 2 teaspoons worcestershire sauce
  • dash of hot red pepper sauce
  • 1-1/2 cups all-purpose flour
  • 1/2 teaspoon salt
  • 1 teaspoon paprika
  1. Preheat oven to 375 degrees F. In a medium bowl, cream cheese, butter, Worcestershire sauce, and hot red pepper sauce until smooth.
  2. In a separate bowl, mix flour and seasoning together.Gradually add in to cheese mixture. Mix until dough forms a smooth ball.
  3. Shape dough into small logs and place in cookie press. Using desired shape, press shapes onto cookie sheets. Bake 10-12 minutes or until lightly golden brown. Cool 2 minutes on cookie sheet on cooling rack. Remove from from sheet and continue to cool on rack.
Adapted from: Wilton Cookie Master Plus: Appetizers, Crackers and More! recipe and instruction booklet.

Thursday, December 23, 2010

"Green Label" Cheese Straws


This recipe is from a vintage recipe booklet from a company called "Green Label," which I gleaned used to make some form of margarine or butter substitute. I liked the book because the recipes seemed reasonable by today's standards and because of this recipe for cheddar straws.
I also was intrigued because many of the recipes in the book have no butter or eggs and could be easily adapted for people with dietary restrictions. That being said this recipe is not one of those. It's main ingredient is cheese.
I substituted butter for the Green Label because I am not entirely sure just what Green Label is and because I like butter. Mmm butter.
The recipe is a basic pie pastry type preparation but with "nippy" cheese added to it to make things interesting. Mmm..."Nippy."
The only tricky part about this recipe is cutting the dough into thin strips and then transferring the strips to the baking sheet and once they were baked, transferring them to a rack to cool. Much breakage occurred. I ate the rejects.
Another tricky thing is that in vintage recipe fashion, the Green Label book was typically vague about the exact baking time of these straws. They are quite thin and bake at a high temperature so I settled on about 10 minutes when the straws began to brown at the edges. That being said depending on the size of your straws and your oven temperature, this is a recipe you have to watch.
You can't really go wrong inviting cheesy pastry to your cocktail party so I highly recommend trying these if only for nostalgia's sake.


Cheese Straws

makes: approximately 1 dozen straws

  • 1 cup sifted flour
  • 1 cup grated "nippy" cheese, i took this to mean cheddar
  • 1/2 teaspoon dry mustard
  • pinch of cayenne
  • 6 tablespoons Green Label, I assumed Green Label was some kind of margarine. I used Butter
  • 1/2 teaspoon Worcestershire sauce
  • cold water
  1. Blend flour, cheese, mustard, and cayenne. Cut in butter.
  2. Mix Worcestershire sauce with 2 tablespoons cold water and work into Green Label mixture.
  3. Work in just enough water to make a pastry.
  4. Roll out to 1/4 -inch thick and cut into strips, approximately 5-inches long and 1/4 -inch wide.
  5. Bake in 400 degree f oven until golden brown. This took me about 10 minutes. Leave the straws to firm up on the baking sheets for a few minutes before transferring them to a rack to cool as they will be less likely to crack that way.
Adapted From: Green Label Cookbook (date of publishing, unknown)

Thursday, December 16, 2010

Cranberry Seed Muffins


These muffins were some of the best cranberry muffins I have had in a while. they are sweet, use wholewheat flour and wheat bran without being heavy or tasting "healthy", they use the tenderizing powers of buttermilk, they have citrus zest to complement the tart whole cranberries...they puff up perfectly in the oven especially of you fill the pans to the top (OK, so I ran out of paper cupcake liners, I made taller muffins not more, what's your excuse?), they are studded with lightly salty sunflower and pumpkin seeds...making them seasonal, and sweet.
These are probably my consummate muffin as it conforms to my rules of muffin-hood
1. Made with healthy ingredients but doesn't taste healthy.
2 Butter and buttermilk. Need i say more?
3. They dome up into almost bakery looking muffin proportions
4. They are aesthetically pleasing because they are topped of with seeds and bran flakes....over top of the bursting cranberry stains the batter
5. they are light and fluffy. Fluffy is always a good thing.
6. They are sweet enough to make you feel like you've had a treat but are wholesome enough to be eaten for breakfast.

If a muffin does not conform to these rules it is hereby exiled to the land of cupcakedom- not a bad fate considering, but then you can't justify eating them for breakfast....and that is saddening.


Cranberry Seed Muffins
Time: approx 1 hour
Makes: 12-16 muffins

Ingredients
  • 1-3/4 cups all purpose flour
  • 3/4 cup whole wheat flour
  • 1/2 cup oat or wheat bran
  • 1-1/2 tsp baking powder
  • 1/2 tsp baking soda
  • 1/2 tsp salt
  • 1/3 cup unsalted sunflower seeds
  • 1/3 cup hulled pumpkin seeds
  • 3/4 cup granulated sugar
  • 1/4 cup packed brown sugar
  • 2 tsp finely grated orange rind
  • 2 eggs
  • 1-1/3 cups buttermilk
  • 1/2 cup unsalted butter, melted and cooled
  • 2 cups thawed cranberries
    Topping:
    3 tbsp each oat bran, sunflower seeds and pumpkin seeds
  1. In large bowl, whisk together all-purpose and whole wheat flours, oat bran, baking powder, baking soda and salt ; whisk in sunflower and pumpkin seeds.
  2. In separate bowl, whisk granulated sugar, brown sugar and orange rind; whisk in eggs and buttermilk. Whisk in butter until combined; stir in flour mixture in 2 additions just until combined. Stir in cranberries. Spoon in to 12 greased muffin cups.

Topping:

Sprinkle with oat bran, sunflower seeds and pumpkin seeds. Bake in 375°F oven until cake tester inserted in centre comes out clean, about 25 minutes. Let cool in pan on rack.

Adapted from: Canadian Living Magazine September 2010

Wednesday, December 15, 2010

Cranberry Vanilla Sorbet


Cranberry and Vanilla Bean sorbet
Makes 1 quart sorbet
Pareve/ vegan
8-ish servings
calories: 220, fat: 1, fiber:2 g

a floral and tart sorbet, the vanilla bean mellows the flavour of the cranberries. Its also ruby red!

• 1 12-oz bag of cranberries (about 3 cups)
• 2-1/2 cups water
• 2 cups sugar
• ½ teaspoon kosher salt
• 1 vanilla bean, split lengthwise
• ¼ cup fresh lemon juice

1. Combine cranberries, 2-1/2 cups water, sugar and salt in a large heavy saucepan. Scrape in seeds from vanilla bean. Add bean to mixture and bring to a boil over medium heat, stirring until sugar dissolves. Reduce heat to low; simmer until cranberries pop and are soft, stirring occasionally, about 10 minutes. Cool to room temperature.
2. Remove vanilla bean from cranberry mixture. Working in batches, puree cranberry mixture in blender. Strain into large bowl; discard solids. Stir in lemon juice. Refrigerate cranberry mixture until well-chilled, at least 4 hours or overnight.
3. Transfer cranberry mixture to ice cream maker and process according to manufacturers instructions. Transfer sorbet to container; cover and freeze.

Adapted from: Bon Appetit Magazine November 2009

Sunday, December 12, 2010

Parmesan Flan with Cherry Tomatoes


I am intrigued by the idea of savoury flans and custards (as well as shortbreads), because I think it's one of those things we expect to be sweet but using savoury elements like cheese and tomatoes and herbs as flavourings can create very interesting dishes...
I also just love eggs. they are kinda miraculous.
These custards are made by flavouring eggs and cream with parmesan cheese instead of sugar or vanilla and then poring the custard over sauteed cherry tomatoes. Sauteeing the tomatoes enhances their flavour and makes them sweet and juicy. Be careful when you eat them, however, as the tomatoes release water and can burst into like burning bubbles of delicious lava in your mouth, and itcan hurt if youre not prepared for that. I think they just need a few minutes to set when come out of the oven for the tomatoe juices to calm down. If I just came out of an oven I know I would.
These have so many delectable possibilities that I want to experiment with. I bet these would be amazing with sauteed mushrooms and thyme instead of tomatoes and basil...Think I'm on to something? ;)


Parmesan and Cherry Tomato Flan.

Makes 6


This is basically a quiche filling that gets poured into ramekins instead of into pastry and gets baked in a water bath to keep them super silky and fluffy.

I bet this would work really well with mushrooms, spinach, broccoli or different cheeses like asiago as well…The possibilities are endless.


  • 1-1/2 tablespoons olive oil
  • 3 cups cherry tomatoes, halved
  • 2 tablespoons fresh basil
  • salt and pepper to taste
  • 2 cups whole milk
  • 3 large eggs
  • 1 large egg yolk
  • ¾ cup freshly grated parmesan cheese
  • 2 tablespoons basil (garnish)

    1. Position a rack in the middle of the oven and preheat to 325 degrees F. Butter 6 6-oz ramekins and line the bottom of each with parchment paper (I skipped the parchment because who wants to cut out all those little circles?) Butter the paper. Have ready a baking dish that can accommodate a water bath and 6 ramekins.
    2. In a frying pan over medium heat, warm the olive oil. Add the tomatoes and sauté stirring often until they soften and the liquid is reduced to about 2 tablespoons, about 6 minutes. Stir in the chopped basil and cook for 2 minutes more. Season with salt and pepper to taste. Spoon the tomato mixture into the prepared ramekins, dividing it evenly among them.
    3. In a bowl, whisk together the milk, eggs, and egg yolk until blended. Stir the cheese into the custard, and then divide the custard evenly among the ramekins.
    4. Place the ramekins in the pan, and pour hot water into the pan to reach halfway up the sides of the ramekins. Bake until the custard is set, about 35 minutes. Carefully transfer the baking pan to wire rack, let custards cool slightly, then lift the ramekins out of the water bath.
    5. To unmould, run a knife around the edge of the ramekins. Place a serving plate on top of each ramekin and invert. Lift off the ramekins and peel off the parchment if using. Serve topped with more tomatoes and garnish with basil. Serve warm.

Adapted from Williams Sonoma

Saturday, December 11, 2010

Carrot Gingerbread Muffins


This recipe is essentially a gingerbread cake batter that gets shredded carrots folded into it. It is really more gingerbread cake than carrot muffin. I love the flavour of these, there is quite a large amount of ground ginger in the batter and it gives the muffins a spicy kick while the cinnamon lends its lingering warmth to the palate. These "muffins" have the texture of delicate soft fluffy cakes. I think these would be delicious with cream cheese frosting, although that would definitely take them out of muffin-land and into cupcake territory.


Carrot Gingerbread Muffins

Dairy,
Time: 1 hour

  • 1/2 sup golden raisins
  • 2-1/4 cup all purpose flour
  • 2-1/2 teaspoons ground ginger
  • 2 teaspoons ground cinnamon
  • 2 teaspoons baking powder
  • 1 teaspoon baking soda
  • 1/2 teaspoon salt
  • 1/4 teaspoon ground nutmeg
  • 1 pinch ground cloves
  • 1/2 cup butter, softened
  • 1/2 cu packed brown sugar
  • 1/4 cup granulated sugar
  • 1/4 cup fancy molasses
  • 1 teaspoon vanilla
  • 2 eggs
  • 3/4 cups plain yogurt or buttermilk
  • 2 cups shredded carrots
  1. In bowl, whisk together flour, ginger, cinnamon, baking powder, baking soda, salt, nutmeg and cloves.
  2. In large bowl, beat butter with brown and granulated sugars until light, about 1 minute. Beat in molasses and vanilla; beat in eggs, 1 at a time. Stir in flour mixture; stir in yogurt until combined. Fold in carrots and raisins just until combined. Spoon into paper-lined or greased muffin cups.
  3. Bake in 350°F (180°C) oven until cake tester inserted in centre comes out clean, about 25 minutes. Transfer to rack; let cool.

adapted from: Canadian Living Magazine Sept 2010

Friday, December 10, 2010

Brown Basmati Rice Pudding


This recipe makes a rich dairy free rice pudding. This version is quite spicy due to the amount of ginger that is infused during cooking. The ginger makes this pudding so much more exotic and alluring and it was a welcome change from my regular rice pudding recipe.
Brown basmati rice is notable for its toasty fragrance that combined with the aromatic scent of the cinnamon stick and fresh ginger made my kitchen smell deliciously comforting. The coconut milk makes this dish rich and coconutty in a subtle way and complements the nuttiness of the brown rice. This is quite the wholesome recipe considering it is made with whole grain rice and only 4 tablespoons of sugar. It is the perfect ending to an Indian style meal served with spicy chai tea.


Brown Basmati Rice Pudding

Serves 4
time: 1 hour and 15 minutes, mostly inactive
vegan
  • 1 cup brown basmati rice
  • 2 cups water
  • 1 cup soy or rice milk
  • 1/2 teaspoon salt
  • 1 1-inch piece ginger peeled and thinly sliced
  • 6 cardamom pods crushed (optional)
  • 3 -inch long cinnamon stick
  • 4 tablespoons/ 2oz/ 60 grams brown sugar
  • 1 can "lite" coconut milk, about 2 cups, (can replace 1/2 with soymilk, if low on coconut milk.)
  • 1 cup golden or dark raisins (optional)
  1. Rinse the basmati rice and place in a heavy bottomed pot. Add water, soy milk, salt, ginger, cardamom and cinnamon. Bring to boil, reduce heat to low and cover for 45 minutes.
  2. Stir in the sugar and coconut milk and simmer the rice without a lid over low heat (there should be bubbles breaking the surface especially as the liquid begins to evaporate). Cook until the liquid evaporates and the pudding thickens, about 30-35 minutes. Remove the ginger slices, cardamom pods and cinnamon stick. Serve hot, warm or room temperature.
From: Rebar Modern Food Cookbook

Thursday, December 9, 2010

Three Seed Biscuits


These are delicious with soups or with roasted red pepper dip or hummus. Good, savoury biscuits to serve as a hearty warming appetizer, cut into stick shape for optimal soup-dipping.


Three Seed Biscuits

Makes: 12 biscuits

Time: 45minutes.

  • 1-1/4 cups all-purpose flour
  • 1 cup whole wheat flour
  • ¼ cup sunflower seeds
  • ¼ flaxseeds (ground or whole)
  • ¼ cup wheat germ (or bran)
  • 1 tablespoon granulated sugar
  • 1 tablespoon baking powder
  • ½ teaspoon salt
  • ½ cup cold butter, cubed
  • 1 cup milk
  • 1 egg or egg white, lightly beaten
  • 2 tablespoons sesame seeds

    1. Whisk together all-purpose flour, whole-wheat flour, sunflower seeds, flaxseeds, wheat germ or bran, sugar, baking powder and salt. Using a pastry blender cut in butter until coarse crumbs form. Stir in milk to form a soft slightly sticky dough.
    2. With floured hands, turn dough out onto a lightly floured surface; knead gently 10 times. Pat out to 7-inch square. Cut into quartets; cut each quarter into 3 strips. Place, 1 inch apart on ungreased baking sheet. Brush tops with egg; sprinkle with sesame seeds.
    3. Bake in centre of 425 degree F oven until golden, about 12 minutes. Let cool on pan on rack.

Adapted from: Canadian Living Magazine November 2010

Tuesday, December 7, 2010

Sugar Cookie Aviary

Showing off my cookie cutters, this is an old photo but I like it a lot (the cooling rack is like a cage! Get it?). I think I need to have a bird themed party! No recipe today because my sugar cookie recipe is top-secret!!!!

Tuesday, November 30, 2010

Muesli Soda Bread


Sorting out my mom's old recipes this summer, I came across this recipe for muesli soda bread, quick loaf that uses whole wheat like my standard soda bread but also uses oats for a different flavour and texture. This soda bread is somewhere between soda bread and scone, in it's appearance. It is shaped into a round loaf and scored in an "x" shape rather than being baked in a pan. it is also sprinkled with oats and sesame seeds before baking . This bread is great as part of a ploughman's lunch served with sharp cheeses and grapes.


The loaf shape is nice because you can slice a thick wedge of this homey bread and douse it with honey and butter for breakfast. the oats add a nice richer flavour to it . I think this recipe will soon replace my usual recipe as it has a softer crust and it is certainly prettier.


Muesli Soda Bread

Makes 1 loaf, approx 20 slices

Dairy

Time: approx 2 hours, including baking time

  • 2 cups whole wheat flour
  • 1 cup all purpose flour
  • ½ cup rolled oats
  • ¼ cup granulated sugar
  • 1 tablespoon baking powder
  • 1 teaspoon baking soda
  • 1 teaspoon salt
  • ¾ cup raisins
  • 2 tablespoons vegetable oil
  • 1-3/4 cups buttermilk

Topping:

  • 1 egg white
  • 1 tablespoon each rolled oats, wheat germ, oat bran, and sesame seeds

    1. In bowl, combine whole wheat and all-purpose flours, rolled oats, baking powder, soda and salt; Stir in raisins. Add oil to buttermilk; pour into flour mixture and stir to make soft dough.
    2. Turn out onto lightly floured surface; knead about 10 times or until smooth.
    3. Place on a greased or lined baking sheet; pat into a circle about 2-1/2 inches thick. Cut large shallow “X” on top.
    4. Topping: brush egg white over dough. Combine rolled oats, wheat germ, bran and sesame seeds; sprinkle over dough. Bake in 350 degree F oven for 65-70 minutes or until tester inserted in middle comes out clean.

Source: unknown, probably an old Canadian Living magazine…..

Monday, November 29, 2010

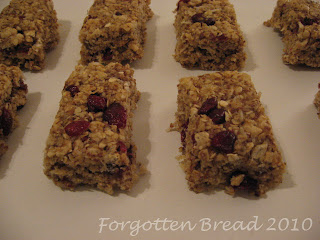
Cranberry Almond Coconut Granola Bars


I finally decided to go for it and make my own granola bars. Since starting school and work, I have spent four months of running between studio and workplace, and less time to eat. I think I've pretty much established that I love to eat.
these granola bars are from Baking Bites.com, which seemed like the best place to start in terms of searching for a recipe. These are also made up of things I adore like almonds, oats, coconut and dried cranberries. They require no baking because you just boil a syrup, and stir in all the "stuff" pour into a pan, pack it down, cool and cut into bars. They taste a bit like jazzed up rice krispie squares, they freeze well, and have been keeping me energized during some long school days. These granola bars also happen to be vegan, and if you swap the rice krispies for gluten free brown rice cereal they can even be made gluten free.
I stupidly made these to take to school for some friends, now I am bombarded with requests for them. What was I thinking?

Coconut, Almond Cranberry Granola Bars

Vegan

Time: 15 minutes, plus cooling time


2 1/2 cups quick-cooking oats
1 1/2 cups puffed rice cereal
1/2 cup almond meal
1/2 cup ground flaxseed
1/2 cup sweetened, shredded coconut
1/2 cup light corn syrup
1/2 cup brown sugar
1/4 cup vegetable oil
1 tsp vanilla extract
1/4 tsp salt
3/4 cup dried cranberries

  1. Line a 9×9″ square baking pan with parchment paper or aluminum foil, lightly greased.
  2. In a large bowl, combine oats, rice krispies, almond meal, ground flaxseed and coconut.
  3. In a small saucepan, combine corn syrup, brown sugar and vegetable oil. Bring to a boil, whisking to dissolve sugar. Remove from heat and stir in vanilla extract and salt. Pour into oat mixture and stir until dry ingredients are evenly moistened. At this point it should look something like unbaked granola. Stir in dried cranberries.
  4. Pour mixture into prepared pan and press down into an even layer. Let stand until cool and set.
  5. Cut into 16-20 bars with a sharp knife. Individually wrap in wax paper, if desired. Store in an airtight container.

From: Bakingbites.com


Sunday, November 28, 2010

Peanut Butter Chocolate Semifreddo


These taste exactly like the peanut buster bars from Dairy Queen! In fact I wish I had thought to sprinkle chopped peanuts on top before serving.
This dessert takes only about 30 minutes to make (not including the time it takes to freeze, that's kindof a bummer) and its surprisingly effortless for something that is very elegant and yet nostalgic.


The texture of the finished dessert is somewhere between a soft ice cream and a mousse. The peanut butter mousse is swirled with a rich semisweet chocolate sauce and a creamy peanut butter ripple, a hint of vanilla in the mousse gives it a flavour reminiscent of ice cream.
The chocolate sauce component conveniently makes more than you will need for the semifreddo, so you get leftover to use for plating design!
as for my changes to the recipe:
I did not have a 5x 10 loaf pan as required by the original recipe so I made a 9x 4 loaf and the leftover got put in freezer-safe silicone cupcake liners to make frozen peanut butter "cups" with chocolate sauce!


My only other note:
It is crucial to make sure the peanut butter and chocolate components are at room temp and thickened before swirling.


Peanut Butter-Chocolate Semifreddo
  • 2 cups whole milk
  • 1-1/2 cups sugar
  • 2 cups creamy peanut butter, not natural
  • 4 ounces/ 3/4 cup semisweet chocolate chips
  • 2 cups heavy cream
  • 1 teaspoon vanilla extract
  1. Line 5 by 10 10 inch jumbo loaf pan with parchment paper, leaving a 4-inch overhang on all sides. In a medium saucepan, combine milk and 1 cup sugar. bring to a simmer over medium- high stirring constantly, until sugar dissolves. remove from heat, add peanut butter, and whisk until smooth. Transfer to a bowl and let cool to room temperature.
  2. In a small saucepan, bring 1/2 cup water and 1/2 cup sugar to a boil over medium-high, stirring occasionally until sugar dissolves. Remove from heat, add chocolate, and stir until chocolate melts and mixture is smooth. Transfer to a small bowl and let cool to room temperature.
  3. In a large bowl, using an electric mixer, beat cream and vanilla until soft peaks form. add half the peanut butter mixture and whisk until combined. with a rubber spatula, add half the remaining peanut butter mixture and gently fold three times(mixture will be rippled.)
  4. Transfer half the cream mixture to loaf pan. Top with half the peanut butter mixture and 1/4 cup chocolate mixture. top with remaining cream mixture, then drizzle with remaining peanut butter mixture and another 1/4 cup chocolate mixture. With a skewer or thin bladed knife, swirl mixtures together. freeze until firm, about 5 hours or up to 3 days. let sit at room temperature before serving with extra chocolate sauce.
Adapted From: Martha Stewart's Every Day Food Magazine July/ August 2010

Saturday, November 27, 2010

Buckwheat Fig Spirals


This recipe is loosely adapted from the recipe for Figgy Buckwheat Scones from 101 Cookbooks. I kept the scone recipe the same but swapped the original fig jam for the fig newton filling from Anna Olson's fig newtons. I really liked the idea of using buckwheat flour in scone form. I had previously only encountered buckwheat flour in pancakes and crepes so this gives me another option for utilizing this delicious flour.


In this application, the buckwheat gave the scones a sweet nutty flavour that made them taste toasty and comforting.The fig filling made just enough to fill the spirals. It was jammy and thick, but not too sweet due to the use of applesauce and orange juice as opposed to sugar for sweetness.
These were so delicious straight from the oven and served with warm apple cider they were perfect for a crisp fall afternoon.


Buckwheat Fig Spirals
makes about 12
dairy
time: 1-1/2 hour

  • 1 cup buckwheat four
  • 1-1/4 all-purpose flour
  • 1/2 cup sugar
  • 2 teaspoons baking powder
  • 1/2 teaspoon kosher salt
  • 1/2 cup cold unsalted butter, cut into pieces
  • 1-1/4 cups heavy cream
  • 1 cup fig filling (a full recipe of filling as given below)
  1. Sift the dry ingredients together int a large bowl. Add the butter to the dry mixture. Cut in butter using fingers or a pastry blender until the butter forms pea sized clumps.
  2. Add the cream and stir gently until all the flour is moistened to form a stucky dough.
  3. Transfer the dough to a well floured surface. Flour your hands to prevent sticking and pat the dough into a rectangle. Using a rolling pin, roll the dough into a rectangle that is 8 inches wide, 16 inches long, and 3/4 inches thick. If at any time the dough rolls off into a different direction, just pat it back into shape. As you are rolling, periodically run a pastry scraper under the dough, and flour the top to prevent sticking.
  4. Spread the fig butter over the dough. Roll the long edge of the dough up, patting the dough as you roll so it forms a neat log, 16 inches long. Roll the finished log so that the seam is on the bottom and the weight of the roll seals the edge.
  5. Use a sharp knife to slice the log in half. Put ht e halves on a baking sheet or plate, cover loosely with plastic wrap, and chill in the refrigerator for 30 minutes. ( the dough can be kept covered in the fridge for up to 2 days.) While the dough is chilling, preheat the oven to 350 degrees F. Line two baking sheets with parchment paper.
  6. After chilling, take both logs out of the refrigerator and cut each half into 6 equal pieces about 1-1/4 inch wide. Place each scone flat, with the spiral of the fig butter facing up, on a baking sheet, 6 to a sheet. Give the scones a squeeze to shape them into rounds.
  7. Bake for 38-42 minutes (mine took about 30-35 minutes), rotating the sheets halfway through. The scones are ready to come out when their undersides are golden brown. these are best eaten warm.
(adapted from 101 Cookbooks.com)

Fig Filling:
• 1 cup diced dried figs
• ½ cup fresh orange juice
• ½ cup unsweetened applesauce
• 4 teaspoons lemon juice
• ½ ground cinnamon

For filling, combine all ingredients in a small saucepan and bring to a simmer. Simmer until all liquid is absorbed, about 10 minutes. Let cool, puree in a food processor and chill completely.

(adapted from: Another Cup of Sugar by Anna Olson)

Friday, November 26, 2010

Dried Cranberry Thyme Shortbread


I came across this recipe for a savoury shortbread in an old LCBO Food and Wine Magazine. The combination of fresh time, lemon zest and dried cranberries intrigued me because dried cranberries aren't often used in savoury baking recipes.


The shortbread are incredible easy to make, the buttery dough comes together quickly in the stand mixer, then gets rolled into logs and put in the fridge. Once firm, just slice and bake. The dough can even be frozen in logs to be baked off for impromptu hor's oeuvres.

These buttery, sweet and herbaceous shortbread are good served with cheeses, especially brie, added to a cheese plate, or just eaten as appetizer nibblers. They are also very festive.


Behold, Pack-man brie loves these shortbread:


Dried Cranberry Thyme Shortbread

Time: 1 hour

Makes about 45 shortbread

dairy


  • 1 cup unsalted butter
  • 1/3 cup sugar
  • 1 teaspoon grated lemon rind
  • 2 teaspoon lemon juice
  • ½ teaspoon salt
  • 1 tablespoon fresh thyme, finely chopped
  • 2 cups all-purpose flour
  • ¼ dried cranberries or cherries, coarsely chopped
  • flour for dusting

    1. Preheat oven to 350 degrees F.
    2. With a mixer, cream together the butter, sugar, rind, juice, salt and thyme. Cream until light and fluffy.
    3. Stir in the flour and cranberries. Stir until combined and then remove from bowl and place on lightly floured surface.
    4. Gently form the dough into a 12-inch log. Roll up in plastic wrap and place in fridge, allow to chill for at least 30 minutes.
    5. Slice the log into ¼-inch medallions and place on baking sheet.
    6. Bake for 12-15 minutes or until edges become light golden.

From: LCBO Food and Drink Holiday 2007

Thursday, November 25, 2010

Cherry Tomato Goat Cheese Clafoutis


Clafoutis is delicious. I wanted it for dinner. This is a savoury version of my favourite funny-sounding French food. I think I have said enough.


Cherry Tomato Clafoutis
1/2 cup all purpose flour
1/2 tsp baking powder
scant 1/2 tsp salt
1/4 tsp black pepper
3 large eggs
1 cup milk (low fat is fine)
2 tbsp fresh basil, roughly chopped
1/3 cup cottage cheese/goat cheese/feta cheese
approx. 18 cherry tomatoes

Preheat oven to 425F. Lightly grease a 10-inch tart pan.
In a large mixing bowl, (or the food processor, if you don’t want to work by hand) whisk together flour, baking powder, salt, pepper, eggs, and milk until mixture is very smooth. Stir in basil and cheese.
Arrange cherry tomatoes over the bottom of the tart dish and pour custard mixture over and around them. Garnish with a few whole basil leaves, if desired.
Bake for 15 minutes at 425F. Turn oven down to 350F and bake an additional 25-30 minutes, until clafoutis is lightly browned and a tester (sharp knife) inserted into the center comes out clean.
Let stand for 15 minutes before serving.

Serves 4-6


adapted from: Baking Bites.com

Friday, November 5, 2010

Buckwheat Pancakes


I have eaten many a buckwheat pancake and this is my new favourite recipe. It uses a combination of buckwheat, all-purpose and whole wheat flours, takes no time to whip up, and is seriously satisfying breakfast material. Seriously, I alliterate things I like.

This recipe also ingeniously combats buckwheat flour's tendency to make everything turn gray-ish. The secret? Molasses. A tiny amount of molasses in place of sugar serves as both a sweetener and a colouring agent to make these pancakes look golden and appetizing.
I ate these with sauteed caramelized apples and walnuts , because i could. mmm breakfast.....

Buckwheat Pancakes
Makes: about 12 pancakes
Dairy Time: 1/2 hour
  • 1/2 cup buckwheat flour
  • 1/2 cup all-purpose flour
  • 1/4 cup whole wheat flour
  • 1 teaspoon baking powder
  • 1/2 teaspoon baking soda
  • 1/2 teaspoon salt
  • 2 eggs
  • 1-1/2 cups buttermilk
  • 2 tablespoons fancy molasses
  1. Sift together the flours, baking powder, soda, and salt. In a separate bowl, lightly whisk the eggs. Stir in the buttermilk and molasses. Combine the wet and dry ingredients, ad gently mix until smooth batter forms, the batter will be thick.
  2. Cook pancakes on a hot buttered griddle, using 1/3 cup batter per pancake. Pour batter by 1/3 cup measure onto hot griddle, and let cook until small bubbles appear on top. Flip pancakes and cook for 2-3 minutes on second side. Serve immediately with maple syrup.
Adapted from: Rebar Modern Food Cookbook

Saturday, October 16, 2010

Peanut Butter Swirl Brownies


There's a reason peanut btter and chocolate make such good partners, I don't know the mechanics of this perfect union of flavours or who discovered it , but I know not to quibble when it comes to deliciousness. Case in point, these brownies, made by dividing a brownie batter into a chocolate brownie and peanut butter blondie batter and then swirling them together to create a delicious treat with the dense fudgy texture of a brownie and the salty satisfying taste of a Reese peanut butter cup. To call these "epic" is an understatement.


I was a little overzealous in my swirling technique. Mine came out less like swirls and more like layers. Not really a problem it just meant equal parts chocolate and peanut butter in each bit, no need to debate which piece i want, i always get the best of both worlds. If only non- dessert things were this equitable. It took quite a lot longer to bake than the original recipe stated but that may have been my oven acting weird . Once baked, they have the firm texture and crackly topping that I think ought to be the marker of a perfect brownie, with a tan coloured swirl of peanut butter. Each bite is layered with the salty sweet and rich combo of peanut butter and chocolate. The addition of the peanut butter chips was an inspired decision on the recipe developers part they add textural complexity and really enhance the peanut butter flavour.


Peanut Butter Swirl Brownies

Makes: about 16 brownies, one 9 inch square

Time: about 1 hour total

  • 2/3 cup granulated sugar
  • ½ cup packed brown sugar
  • ½ cup butter, softened
  • 2 tablespoons milk
  • 2 eggs
  • ¾ cups all-purpose flour
  • ½ teaspoon baking powder
  • ¼ teaspoon salt
  • ¼ cup creamy peanut butter
  • 1/3 cup peanut butter chips
  • 1/3 cup cocoa
  • 1/3 cup chocolate chips

    1. Preheat oven to 350 degrees f. Grease 9-inch square pan. Beat sugars, butter, milk and eggs in a large bowl with electric mixer on medium speed. Stir in flour, baking powder and salt. Divide batter in half (1 cup plus 2 tablespoons for each half.) Stir peanut butter and peanut butter chips into one half. Stir cocoa and chocolate chips into the remaining half.
    2. Spoon the chocolate batter into the pan in 8 mounds in a checkerboard pattern. Spoon peanut butter batter between mounds of chocolate batter. Gently swirl batters with knife for a marbled design.
    3. Bake 30-35 minutes (I needed about 45 minutes) or until toothpick inserted in center comes out clean. Cool completely. Cut into bars.


From: Betty Crocker's Cookie Book

Friday, October 15, 2010

Savoury Rugelach


Traditional rugelach, which I have blogged about before, are Jewish cookies made of a cream cheese pastry topped with a sweet filling of jam, nuts, chocolate, or cinnamon sugar and rolled into distinctive croissant like shapes. This recipe is an innovative variation on that popular and delicious cookie. Instead of a sweet dough and filling, the cream cheese dough is made with herbs, and is rolled up with toasted pine nuts and black olive tapenade. The finished cookies can be eaten warm or room temperature as very addicting appetizers at a cocktail or dinner party. They can be made ahead and frozen. I love the idea of making savoury versions of traditionally sweet foods, and could see all kinds of flavour combinations in place of the tapenade, pine nut and herb combination used here....ie dill and smoked salmon rugelach,fig and goat cheese rugelach....the possibilities are endless!
This recipe uses 1/2 a block of cream cheese and makes about 16 rugelach...for a big party the recipe is easy to double.


Savoury Rugelach with Pine Nuts and Tapenade

  • 1 cup all-purpose flour
  • ¾ teaspoon dried thyme
  • ¼ teaspoon salt
  • ½ teaspoon ground black pepper
  • ½ cup butter, softened
  • ½ cup cream cheese, softened
  • About 1/2 cup olive tapenade
  • About 1/ cup pine nuts

1. Whisk together flour, thyme, salt, and pepper in a bowl.

2. Beat together butter and cream cheese in a large bowl with an electric mixer until well combined. Add the flour mixture and mix at a low speed until a soft dough forms. Gather dough into a ball, then halve dough, and wrap each half in plastic wrap. Flatten each half, in plastic wrap, forming a 4-inch disk. Refrigerate for six hours to allow gluten in dough to relax (I left it for only 2 hours dough was fine).

3. Preheat oven to 350 degrees F.

4. Starting with one disk of dough, roll dough on a floured board into a 9’ round. Spread tapenade evenly over dough (spread thinly it doesn’t need a lot.). Sprinkle with pine nuts. Cut the round of dough into 16 wedges.

5. Beginning at base of wedge, roll up dough as tightly as possible toward point and transfer point side down to an unlined baking sheet. Repeat with remaining dough and tapenade, arranging wedges f dough 1-1/2 inches apart. Bake until golden brown, 20-25 minutes. Cool on baking sheet on a rack. Serve warm or at room temperature.

Notes:

Dough can be made one day ahead.

Can be served either warm or cold, reheat if desired at 325 for 10-12 min.

Adapted From: “Gourmet Today” ed. Ruth Reichl

Tuesday, September 28, 2010

Cranberry Pistachio Biscotti


I've made biscotti before, but this is one recipe that I've had on my to do list since discovering the awesomeness that is the pistachio. Fun to say, fun to look at, pistachios have quickly become my favourite nut.


These particular biscotti take the form of orange and vanilla scented crisps full of tangy dried cranberries and lurid green pistachios. The buttery crunch of the nuts and the chewyness of the dried fruit creates an interesting texture. I often dip my biscotti in melted chocolate, but I chose not to add any embellishment to these ones. Even unadorned they are by no means "plain." The flavur of citrus has a great supporting role while the cranberries and pistachios take the starring roles. Adding anything else would turn this duo into some tangled love triangle and ...... Never mind, just go bake some biscotti, brew some tea or coffee and watch some classic movies. It's better that way.


Cranberry Pistachio Biscotti

Makes 2 dozen biscotti

Dairy


· 1 cup shelled pistachios, preferably unsalted

· 2 cups all-purpose flour

· 1-1/2 teaspoons baking powder

· ½ teaspoon salt

· ½ cup butter, room temperature

· 1 cup granulated sugar

· 2 teaspoons finely grated orange peel

· 2 eggs

· 1 teaspoon vanilla extract

· 1 cup dried cranberries

1. Preheat oven to 350 degrees f. Place nuts on a baking sheet and toast until fragrant, about 10 minutes. Remove from baking sheet: set aside to cool. Leave oven on. Line another baking sheet with parchment paper.

2. Ina small bowl, whisk flour with baking powder and salt; set aside. Using an electric mixer, beat butter with sugar and orange peel on high speed until light coloured. Add eggs one at a time, beating well after each addition. Scrape down sides if necessary. Beat in vanilla. Reduce speed to low; beat in flour mixture. Stir in cooled nuts and dried cranberries. Dough will be soft.

3. Transfer dough to a lightly floured surface and divide in half. Spacing apart, place pieces of dough on baking sheet. Form each into a log measuring abut 9x 2-1/2 inches, leaving at least 2 inches between the logs. Bake in oven 25 minutes. Remove from oven and let cool on pan on a rack for 10 minutes. Leave oven on. Transfer each baked log to cutting board. Cut into ½ inch slices. Stand biscotti upright on baking sheet. Return to oven; bake 20 more minutes or until golden. Cool completely on a rack. Store in an airtight container.


Adapted from LCBO Food and Drink Magazine

Tuesday, September 14, 2010

Rice Pudding


Making rice pudding has been on my to-do list for a while. This recipe comes from the Gourmet Cookbook. This recipe utilizes a vanilla bean, one of my baking obsessions, but even if you substitute a tablespoon of vanilla extract, this is still a basic recipe made with simple ingredients.
Rice pudding has a long and complex history as rice pudding-type desserts show up in virtually every type of cuisine. In fact in every bowl of rice pudding there is a tale of conquest and globalization, made easier to swallow with some sweet starchy goodness. Indeed, I researched this. It seems rice pudding was brought to the British through colonialism, specifically from the British colonies in India.The rice pudding we know and love today was inspired by Indian Kheer.
This recipe is a simple vanilla version. Plain long grain white rice gets cooked with water, butter and a touch of lemon zest, as you would any rice dish. Once cooked, the milk gets simmered with a vanila bean to bring out its subtle sweet fragrance. The cooked rice then gets stirred into the milk and simmered for 15 minutes longer so that the startches thicken the milk into a creamy pudding, and the rice and raisins soften into a luscious toothsome dessert. The finished pudding gets dusted with cinnamon, and the heat of the rice wafts the scent of vanilla and cinnamon into the kitchen.


I ran out of milk and I used half milk and half water to no ill effect, so this recipe can be as sinful or as virtuous as you wish. I used a mix of golden and dark raisins, because I like the look of the two different colours interspersed with the pale vanilla flecked pudding. The flavours were subdued but the effect was pure comfort food. It is no wonder this is such a popular dish worldwide.


Rice Pudding

Combines the flavours of vanilla bean, lemon and cinnamon. Served warm or cold.

Serves 6-8 active time 40 min, about 1 hour start to finish

Dairy

  • 2 cups water
  • 2 tablespoons unsalted butter
  • ¼ teaspoon salt
  • ½ teaspoon finely grated lemon zest
  • 1 cup long grain white rice
  • 4 cups milk (I used 2 cups 1% milk and two cups water and the pudding worked fine)
  • ½ cup sugar
  • ½ vanilla bean, halved lengthwise
  • 1 cup raisins, I used a mix of regular and golden raisins
  • ground cinnamon for sprinkling

    1. Combine water, butter, salt and lemon zest in a medium saucepan and bring to a boil. Stir in rice and return to a boil, then cover and simmer over very low heat until water is absorbed, about 15 minutes.
    2. Combine milk, sugar and vanilla bean in a 3-quart saucepan and bring just to a simmer over low heat. Add rice mixture and raisins and simmer, uncovered stirring frequently, until most of milk is absorbed and rice is creamy, about 20 minutes.
    3. Transfer pudding to a bowl: discard vanilla bean. Dust with cinnamon and cool until just warm before serving.

Adapted from: The Gourmet Cookbook ed. Ruth Reichl