Tuesday, November 30, 2010

Muesli Soda Bread


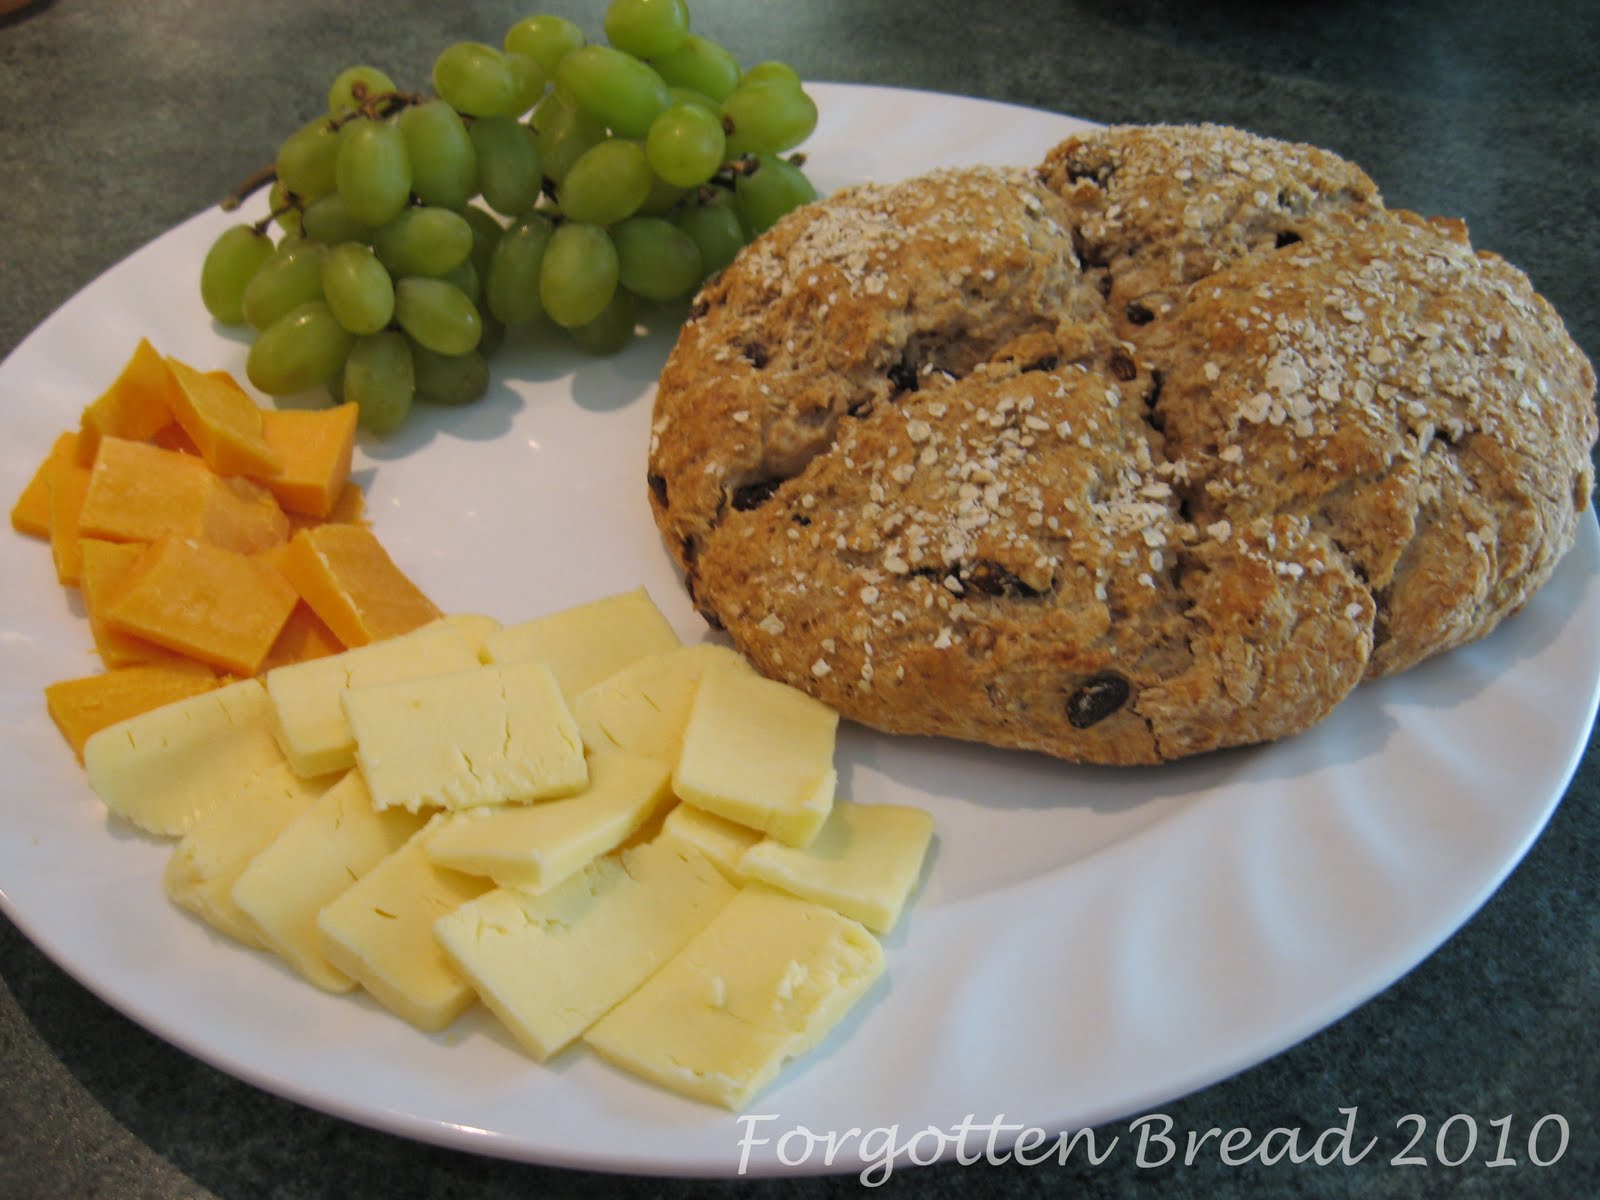
Sorting out my mom's old recipes this summer, I came across this recipe for muesli soda bread, quick loaf that uses whole wheat like my standard soda bread but also uses oats for a different flavour and texture. This soda bread is somewhere between soda bread and scone, in it's appearance. It is shaped into a round loaf and scored in an "x" shape rather than being baked in a pan. it is also sprinkled with oats and sesame seeds before baking . This bread is great as part of a ploughman's lunch served with sharp cheeses and grapes.


The loaf shape is nice because you can slice a thick wedge of this homey bread and douse it with honey and butter for breakfast. the oats add a nice richer flavour to it . I think this recipe will soon replace my usual recipe as it has a softer crust and it is certainly prettier.


Muesli Soda Bread

Makes 1 loaf, approx 20 slices

Dairy

Time: approx 2 hours, including baking time

  • 2 cups whole wheat flour
  • 1 cup all purpose flour
  • ½ cup rolled oats
  • ¼ cup granulated sugar
  • 1 tablespoon baking powder
  • 1 teaspoon baking soda
  • 1 teaspoon salt
  • ¾ cup raisins
  • 2 tablespoons vegetable oil
  • 1-3/4 cups buttermilk

Topping:

  • 1 egg white
  • 1 tablespoon each rolled oats, wheat germ, oat bran, and sesame seeds

    1. In bowl, combine whole wheat and all-purpose flours, rolled oats, baking powder, soda and salt; Stir in raisins. Add oil to buttermilk; pour into flour mixture and stir to make soft dough.
    2. Turn out onto lightly floured surface; knead about 10 times or until smooth.
    3. Place on a greased or lined baking sheet; pat into a circle about 2-1/2 inches thick. Cut large shallow “X” on top.
    4. Topping: brush egg white over dough. Combine rolled oats, wheat germ, bran and sesame seeds; sprinkle over dough. Bake in 350 degree F oven for 65-70 minutes or until tester inserted in middle comes out clean.

Source: unknown, probably an old Canadian Living magazine…..

Monday, November 29, 2010

Cranberry Almond Coconut Granola Bars


I finally decided to go for it and make my own granola bars. Since starting school and work, I have spent four months of running between studio and workplace, and less time to eat. I think I've pretty much established that I love to eat.
these granola bars are from Baking Bites.com, which seemed like the best place to start in terms of searching for a recipe. These are also made up of things I adore like almonds, oats, coconut and dried cranberries. They require no baking because you just boil a syrup, and stir in all the "stuff" pour into a pan, pack it down, cool and cut into bars. They taste a bit like jazzed up rice krispie squares, they freeze well, and have been keeping me energized during some long school days. These granola bars also happen to be vegan, and if you swap the rice krispies for gluten free brown rice cereal they can even be made gluten free.
I stupidly made these to take to school for some friends, now I am bombarded with requests for them. What was I thinking?

Coconut, Almond Cranberry Granola Bars

Vegan

Time: 15 minutes, plus cooling time


2 1/2 cups quick-cooking oats
1 1/2 cups puffed rice cereal
1/2 cup almond meal
1/2 cup ground flaxseed
1/2 cup sweetened, shredded coconut
1/2 cup light corn syrup
1/2 cup brown sugar
1/4 cup vegetable oil
1 tsp vanilla extract
1/4 tsp salt
3/4 cup dried cranberries

  1. Line a 9×9″ square baking pan with parchment paper or aluminum foil, lightly greased.
  2. In a large bowl, combine oats, rice krispies, almond meal, ground flaxseed and coconut.
  3. In a small saucepan, combine corn syrup, brown sugar and vegetable oil. Bring to a boil, whisking to dissolve sugar. Remove from heat and stir in vanilla extract and salt. Pour into oat mixture and stir until dry ingredients are evenly moistened. At this point it should look something like unbaked granola. Stir in dried cranberries.
  4. Pour mixture into prepared pan and press down into an even layer. Let stand until cool and set.
  5. Cut into 16-20 bars with a sharp knife. Individually wrap in wax paper, if desired. Store in an airtight container.

From: Bakingbites.com


Sunday, November 28, 2010

Peanut Butter Chocolate Semifreddo


These taste exactly like the peanut buster bars from Dairy Queen! In fact I wish I had thought to sprinkle chopped peanuts on top before serving.
This dessert takes only about 30 minutes to make (not including the time it takes to freeze, that's kindof a bummer) and its surprisingly effortless for something that is very elegant and yet nostalgic.


The texture of the finished dessert is somewhere between a soft ice cream and a mousse. The peanut butter mousse is swirled with a rich semisweet chocolate sauce and a creamy peanut butter ripple, a hint of vanilla in the mousse gives it a flavour reminiscent of ice cream.
The chocolate sauce component conveniently makes more than you will need for the semifreddo, so you get leftover to use for plating design!
as for my changes to the recipe:
I did not have a 5x 10 loaf pan as required by the original recipe so I made a 9x 4 loaf and the leftover got put in freezer-safe silicone cupcake liners to make frozen peanut butter "cups" with chocolate sauce!


My only other note:
It is crucial to make sure the peanut butter and chocolate components are at room temp and thickened before swirling.


Peanut Butter-Chocolate Semifreddo
  • 2 cups whole milk
  • 1-1/2 cups sugar
  • 2 cups creamy peanut butter, not natural
  • 4 ounces/ 3/4 cup semisweet chocolate chips
  • 2 cups heavy cream
  • 1 teaspoon vanilla extract
  1. Line 5 by 10 10 inch jumbo loaf pan with parchment paper, leaving a 4-inch overhang on all sides. In a medium saucepan, combine milk and 1 cup sugar. bring to a simmer over medium- high stirring constantly, until sugar dissolves. remove from heat, add peanut butter, and whisk until smooth. Transfer to a bowl and let cool to room temperature.
  2. In a small saucepan, bring 1/2 cup water and 1/2 cup sugar to a boil over medium-high, stirring occasionally until sugar dissolves. Remove from heat, add chocolate, and stir until chocolate melts and mixture is smooth. Transfer to a small bowl and let cool to room temperature.
  3. In a large bowl, using an electric mixer, beat cream and vanilla until soft peaks form. add half the peanut butter mixture and whisk until combined. with a rubber spatula, add half the remaining peanut butter mixture and gently fold three times(mixture will be rippled.)
  4. Transfer half the cream mixture to loaf pan. Top with half the peanut butter mixture and 1/4 cup chocolate mixture. top with remaining cream mixture, then drizzle with remaining peanut butter mixture and another 1/4 cup chocolate mixture. With a skewer or thin bladed knife, swirl mixtures together. freeze until firm, about 5 hours or up to 3 days. let sit at room temperature before serving with extra chocolate sauce.
Adapted From: Martha Stewart's Every Day Food Magazine July/ August 2010

Saturday, November 27, 2010

Buckwheat Fig Spirals


This recipe is loosely adapted from the recipe for Figgy Buckwheat Scones from 101 Cookbooks. I kept the scone recipe the same but swapped the original fig jam for the fig newton filling from Anna Olson's fig newtons. I really liked the idea of using buckwheat flour in scone form. I had previously only encountered buckwheat flour in pancakes and crepes so this gives me another option for utilizing this delicious flour.


In this application, the buckwheat gave the scones a sweet nutty flavour that made them taste toasty and comforting.The fig filling made just enough to fill the spirals. It was jammy and thick, but not too sweet due to the use of applesauce and orange juice as opposed to sugar for sweetness.
These were so delicious straight from the oven and served with warm apple cider they were perfect for a crisp fall afternoon.


Buckwheat Fig Spirals
makes about 12
dairy
time: 1-1/2 hour

  • 1 cup buckwheat four
  • 1-1/4 all-purpose flour
  • 1/2 cup sugar
  • 2 teaspoons baking powder
  • 1/2 teaspoon kosher salt
  • 1/2 cup cold unsalted butter, cut into pieces
  • 1-1/4 cups heavy cream
  • 1 cup fig filling (a full recipe of filling as given below)
  1. Sift the dry ingredients together int a large bowl. Add the butter to the dry mixture. Cut in butter using fingers or a pastry blender until the butter forms pea sized clumps.
  2. Add the cream and stir gently until all the flour is moistened to form a stucky dough.
  3. Transfer the dough to a well floured surface. Flour your hands to prevent sticking and pat the dough into a rectangle. Using a rolling pin, roll the dough into a rectangle that is 8 inches wide, 16 inches long, and 3/4 inches thick. If at any time the dough rolls off into a different direction, just pat it back into shape. As you are rolling, periodically run a pastry scraper under the dough, and flour the top to prevent sticking.
  4. Spread the fig butter over the dough. Roll the long edge of the dough up, patting the dough as you roll so it forms a neat log, 16 inches long. Roll the finished log so that the seam is on the bottom and the weight of the roll seals the edge.
  5. Use a sharp knife to slice the log in half. Put ht e halves on a baking sheet or plate, cover loosely with plastic wrap, and chill in the refrigerator for 30 minutes. ( the dough can be kept covered in the fridge for up to 2 days.) While the dough is chilling, preheat the oven to 350 degrees F. Line two baking sheets with parchment paper.
  6. After chilling, take both logs out of the refrigerator and cut each half into 6 equal pieces about 1-1/4 inch wide. Place each scone flat, with the spiral of the fig butter facing up, on a baking sheet, 6 to a sheet. Give the scones a squeeze to shape them into rounds.
  7. Bake for 38-42 minutes (mine took about 30-35 minutes), rotating the sheets halfway through. The scones are ready to come out when their undersides are golden brown. these are best eaten warm.
(adapted from 101 Cookbooks.com)

Fig Filling:
• 1 cup diced dried figs
• ½ cup fresh orange juice
• ½ cup unsweetened applesauce
• 4 teaspoons lemon juice
• ½ ground cinnamon

For filling, combine all ingredients in a small saucepan and bring to a simmer. Simmer until all liquid is absorbed, about 10 minutes. Let cool, puree in a food processor and chill completely.

(adapted from: Another Cup of Sugar by Anna Olson)

Friday, November 26, 2010

Dried Cranberry Thyme Shortbread


I came across this recipe for a savoury shortbread in an old LCBO Food and Wine Magazine. The combination of fresh time, lemon zest and dried cranberries intrigued me because dried cranberries aren't often used in savoury baking recipes.


The shortbread are incredible easy to make, the buttery dough comes together quickly in the stand mixer, then gets rolled into logs and put in the fridge. Once firm, just slice and bake. The dough can even be frozen in logs to be baked off for impromptu hor's oeuvres.

These buttery, sweet and herbaceous shortbread are good served with cheeses, especially brie, added to a cheese plate, or just eaten as appetizer nibblers. They are also very festive.


Behold, Pack-man brie loves these shortbread:


Dried Cranberry Thyme Shortbread

Time: 1 hour

Makes about 45 shortbread

dairy


  • 1 cup unsalted butter
  • 1/3 cup sugar
  • 1 teaspoon grated lemon rind
  • 2 teaspoon lemon juice
  • ½ teaspoon salt
  • 1 tablespoon fresh thyme, finely chopped
  • 2 cups all-purpose flour
  • ¼ dried cranberries or cherries, coarsely chopped
  • flour for dusting

    1. Preheat oven to 350 degrees F.
    2. With a mixer, cream together the butter, sugar, rind, juice, salt and thyme. Cream until light and fluffy.
    3. Stir in the flour and cranberries. Stir until combined and then remove from bowl and place on lightly floured surface.
    4. Gently form the dough into a 12-inch log. Roll up in plastic wrap and place in fridge, allow to chill for at least 30 minutes.
    5. Slice the log into ¼-inch medallions and place on baking sheet.
    6. Bake for 12-15 minutes or until edges become light golden.

From: LCBO Food and Drink Holiday 2007

Thursday, November 25, 2010

Cherry Tomato Goat Cheese Clafoutis


Clafoutis is delicious. I wanted it for dinner. This is a savoury version of my favourite funny-sounding French food. I think I have said enough.


Cherry Tomato Clafoutis
1/2 cup all purpose flour
1/2 tsp baking powder
scant 1/2 tsp salt
1/4 tsp black pepper
3 large eggs
1 cup milk (low fat is fine)
2 tbsp fresh basil, roughly chopped
1/3 cup cottage cheese/goat cheese/feta cheese
approx. 18 cherry tomatoes

Preheat oven to 425F. Lightly grease a 10-inch tart pan.
In a large mixing bowl, (or the food processor, if you don’t want to work by hand) whisk together flour, baking powder, salt, pepper, eggs, and milk until mixture is very smooth. Stir in basil and cheese.
Arrange cherry tomatoes over the bottom of the tart dish and pour custard mixture over and around them. Garnish with a few whole basil leaves, if desired.
Bake for 15 minutes at 425F. Turn oven down to 350F and bake an additional 25-30 minutes, until clafoutis is lightly browned and a tester (sharp knife) inserted into the center comes out clean.
Let stand for 15 minutes before serving.

Serves 4-6


adapted from: Baking Bites.com

Friday, November 5, 2010

Buckwheat Pancakes


I have eaten many a buckwheat pancake and this is my new favourite recipe. It uses a combination of buckwheat, all-purpose and whole wheat flours, takes no time to whip up, and is seriously satisfying breakfast material. Seriously, I alliterate things I like.

This recipe also ingeniously combats buckwheat flour's tendency to make everything turn gray-ish. The secret? Molasses. A tiny amount of molasses in place of sugar serves as both a sweetener and a colouring agent to make these pancakes look golden and appetizing.
I ate these with sauteed caramelized apples and walnuts , because i could. mmm breakfast.....

Buckwheat Pancakes
Makes: about 12 pancakes
Dairy Time: 1/2 hour
  • 1/2 cup buckwheat flour
  • 1/2 cup all-purpose flour
  • 1/4 cup whole wheat flour
  • 1 teaspoon baking powder
  • 1/2 teaspoon baking soda
  • 1/2 teaspoon salt
  • 2 eggs
  • 1-1/2 cups buttermilk
  • 2 tablespoons fancy molasses
  1. Sift together the flours, baking powder, soda, and salt. In a separate bowl, lightly whisk the eggs. Stir in the buttermilk and molasses. Combine the wet and dry ingredients, ad gently mix until smooth batter forms, the batter will be thick.
  2. Cook pancakes on a hot buttered griddle, using 1/3 cup batter per pancake. Pour batter by 1/3 cup measure onto hot griddle, and let cook until small bubbles appear on top. Flip pancakes and cook for 2-3 minutes on second side. Serve immediately with maple syrup.
Adapted from: Rebar Modern Food Cookbook